")
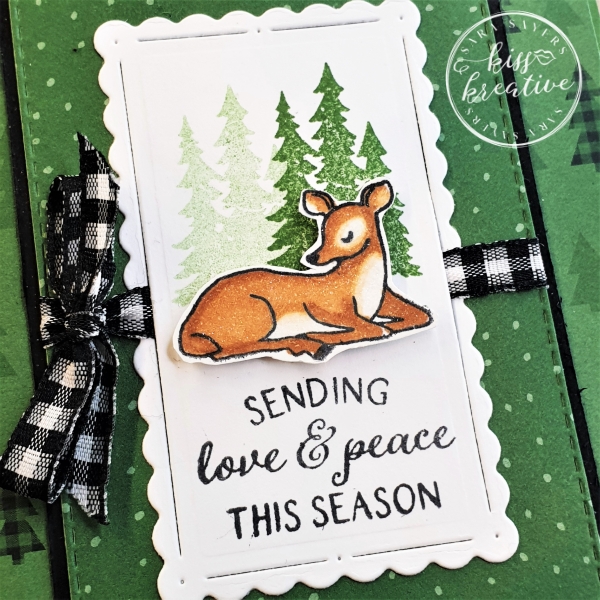
Hello there Crafty friends. Welcome to this month’s Stamp Impressions Europe blog hop. I am part of an amazing group of demonstrators from all around Europe and we will be sharing some wonderful ideas based around a monthly theme. This month we are celebrating anything Christmas , so I thought I would have some share a beautiful Peaceful Deer Shadow box that we made at a recent class

make A Peaceful Deer Shadow Box Card
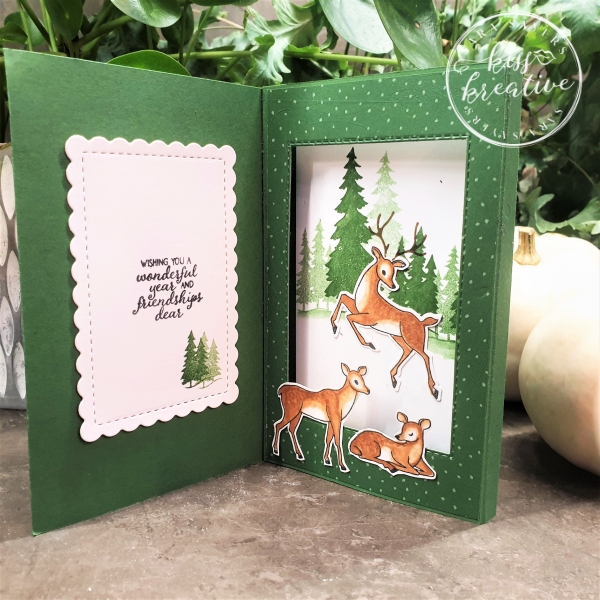
I love a card that not only looks amazing from the front, but also provides a little surprise inside. You too?
Well you won’t be disappointed today as I share this super cute Peaceful Deer shadow box card
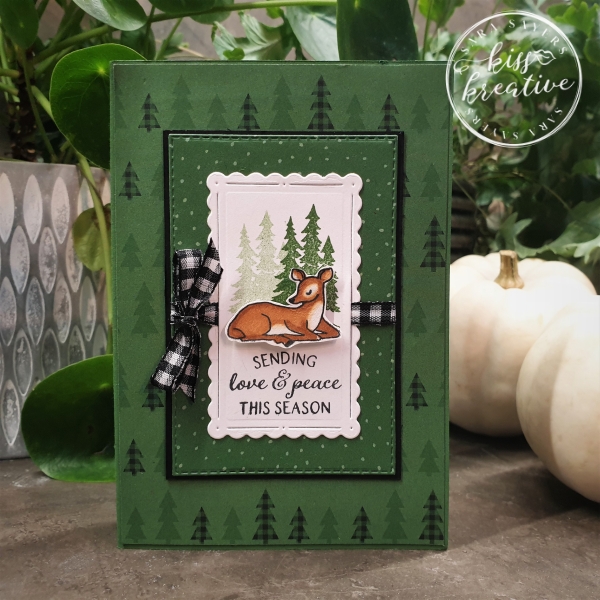
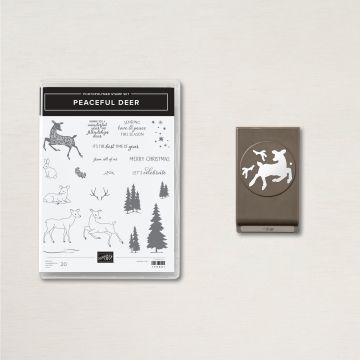
This card was made using the Peaceful Deer Bundle. A wonderful set which has a coordinating punch. Perfect for quick and easy Christmas cards.
Check out the inside of the card. A lovely 3D winter scene & you won’t believe how easy this is to make!
Measurements – Peaceful Deer Shadow Box Card
- Card Base – Garden Green –29.7 cm by 14.5 cm scored at 10.0 cm, 19.0 cm, 20.0 cm & 29.0 cm
- First – Front Layer – DSP – 14.2 cm by 9.7 cm
- Second – Front Layer – Basic Black – 10.3 cm by 7.0 cm (NB: Cut to match the size of your aperture offcut pls 3 mm on each dimension)
- Third Front Layer – Basic White – 8.5 cm by 5.0 cm – die cut using the second smallest Scalloped Contour die
- Inside Left of Card –Basic White 10.0 cm by 7.0 cm – die cut using the middle-sized Scalloped Contour die
- – DSP – 14.2 cm by 8.7 cm
- Inner Right Inside Layer 1 – DSP – 14.2 cm by 8.7 cm
- Inside Right Inside Layer 2 – Basic White – 12.5 cm by 8.7 cm
- Deer – Basic White Scraps
make A Peaceful Deer Shadow Box Card
- With the tiny, scored edge to your left add the inside right front DSP to the next section along
- Die cut a window in the panel using the fourth Largest Stitched rectangle die
- Fold and flatten all score lines to create the shadow box and card front
- Stamp the trees on Inside Right Inside Layer 2 Basic White
- Add both layers to the inside of the shadow box
- Stick the shadow box together
- Decorate each section as shown on the photos
Voila!
I so enjoyed making this card and I would love to know what you think? Please do leave me a comment.
I made another version of this card on my Facebook Live this week and you can see it here
If you would like to know more about any of my projects please do get in contact and I would be happy to help you. I go live on Facebook every Monday and Wednesday at 11.00 am UTC +1 (BST) showing lots of cardmaking tips and tricks
Stamp Impression Design Team Blog Hop
So now it’s time to hop around the rest of the wonderful demonstrators blogs to see some more inspiration for using these wonderful patterned papers. You should have arrived here from Yolanda’s post. Wasn’t her project fabulous?

Click on the button above to go to Sigrid’s post. You can see the rest of the Design Team below!
- Yolanda Pasterkamp-de Jonge – Attelyootje
- Sara Sayers – KISS Kreative That’s me!
- Sigrid Joch – Sigrids kreative ART
- Judith Gryspeerdt : Les petits papiers d’Ilse
- Martina Duchkowitsch – Tinas Bastelecke
- Yvonne Spikmans-Van Bruggan – The Creative Teacup
- Salina – PaperStar*
- Martina Auer – Fräulein Erdbeerli:
- Miranda Versteeg – Atelier Negen
- Rosalien Zwackhalen – Rosaliens Creations
- Fanny Minne – Homemade by Fanny
- Jose Hoogeveen – Stampin Treasure
Stamping Hugs
Sara
- Shop Stampin Up – Earn 10% rewards on all qualifying purchases over £20
- Request a catalogue
- Buy a starter Kit
- Find out about joining our group of Hugs & Kisses Stampers
Your card is amazing! And I love the atmosphere. Thanks for sharing … and merry christmas!
Oh how cute is this! Great job
Beautiful Sara!! Love your coloring of the deer! x
What a wonderful card you made! Love it!
Love, Yolanda